Tu sei qui
Esercitazione_1 - Analisi solare_Largo del Pallaro 4_Roma - Aleksandra Stosic
STEPS OF THE ANALYSIS - passaggi dell'analisi
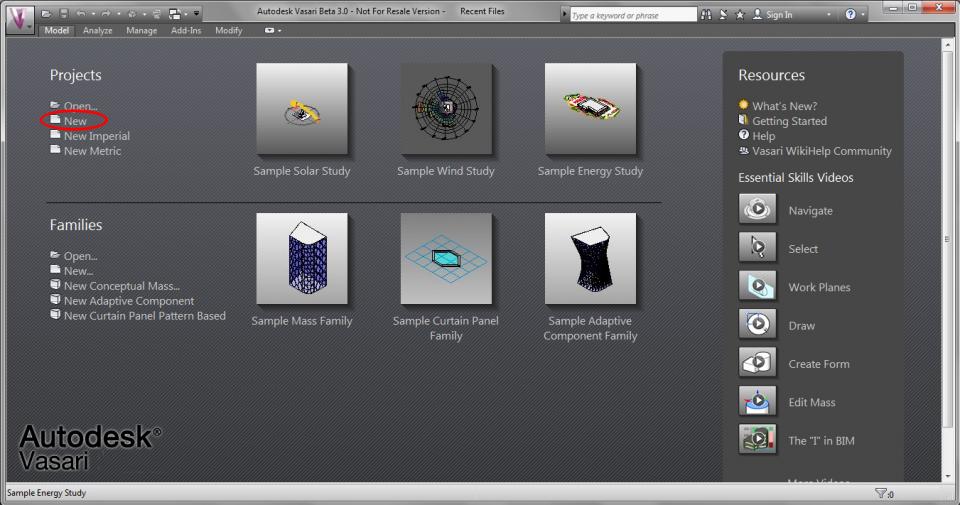
1. Open Autodesk Vasari. From the home page, open a new project.
Apri Autodesk Vasari. Dalla pagina iniziale, apri un nuovo progetto (“New Project”, in alto a sinistra)
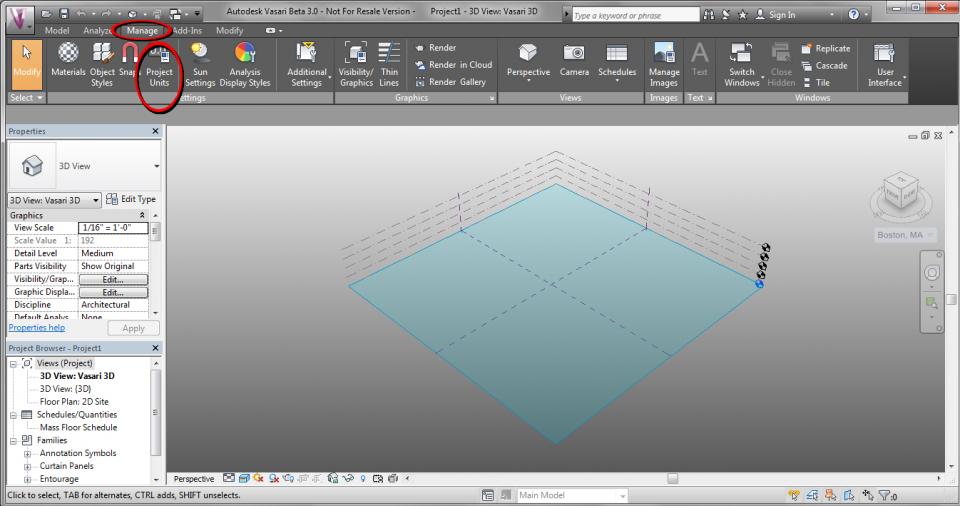
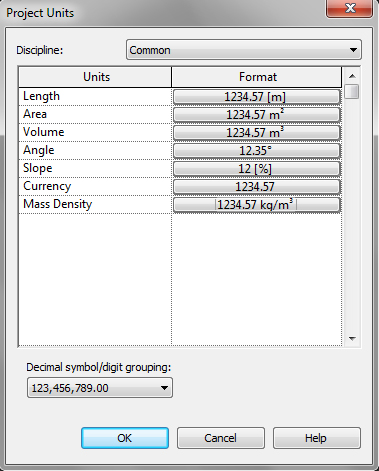
2. Open the “Manage” tab and click on “Project Units”, then change the units format from feet to meters and set the slope in percentage.
Vai sul tab “Manage” e clicca su “Project Units”, dunque cambia il formato delle unità da piedi a metri e imposta la pendenza in percentuale.
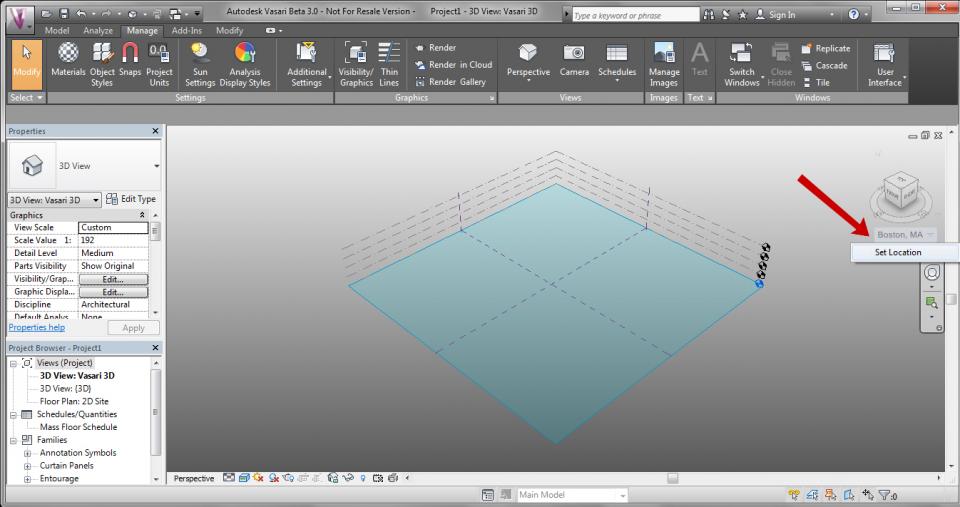
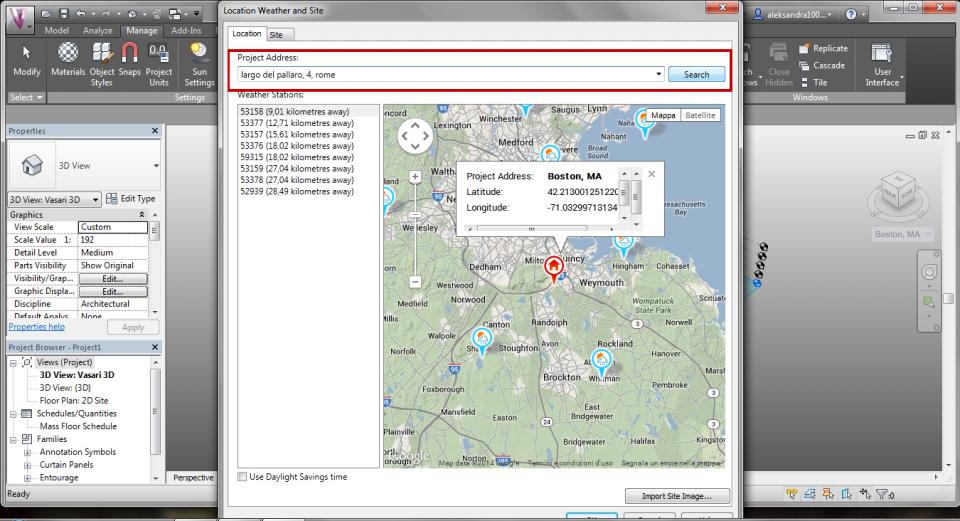
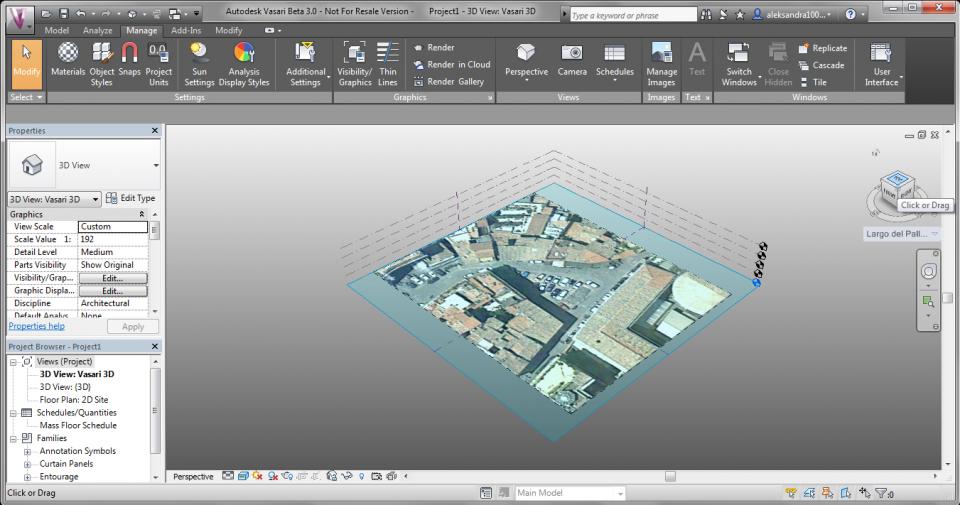
3. From the “Analyse” tab or by clicking on “Boston, MA”, under the cube on the right, you can set the project location. Once you opened the window, in the search bar insert the project adress and press search. Be careful to choose the right weather station, not just the closest one, but the one that is located in a place that has a similar climate to your zone of the analysis. Click on “Import Site” and select the portion of the area you want to work on (try to include the context around your building, not only the building), then import.
Andando sul tab “Analyse” o cliccando sulla scritta “Boston, MA”, che si trova sotto al cubo sulla destra, si può impostare la localizzazione del progetto. Una
volta aperta la finestra, nella barra di ricerca inserisci l’indirizzo del progett e invia la ricerca cliccando su “Search”. Fai attenzione a scegliere la stazione
metereologica corretta, non necessariamente la più vicina, ma quella che si trova in un’area che abbia un clima simile alla zona sottoposta alla vostra analisi.
Clicca su “Import Site” e seleziona la porzione di area su cui vuoi lavorare (cerca di includere il contesto intorno all’edificio, non solo l’edificio), quindi importa
l’immagine.

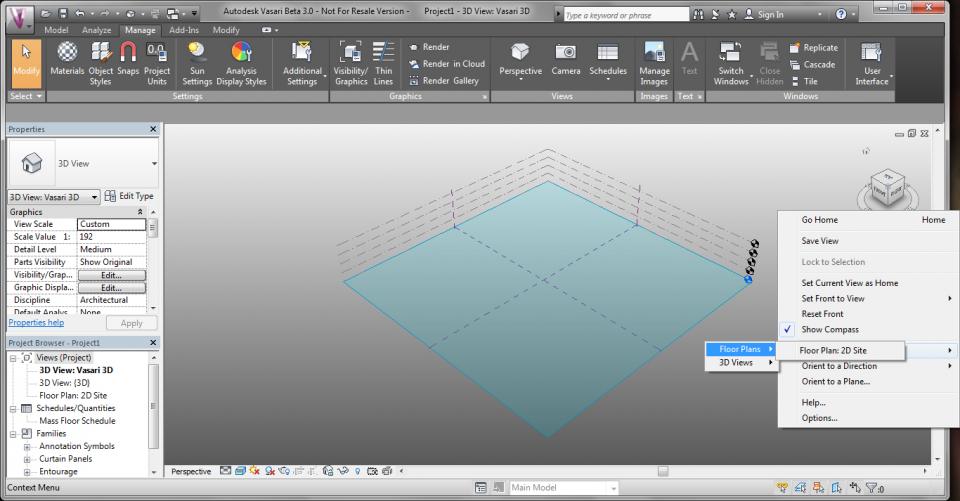
4. Now click on the little arrow on the right side of the cube to open the drop-down window, go to “Orient to view”> “Floor Plans”> “Floor Plan: 2D Site”, to set a 2D view from the top.
Ora clicca sulla piccola freccetta alla destra dle cubo per aprire il menu a tendina, vai su “Orient to view”> “Floor Plans”> “Floor Plan: 2D Site” per impostare
la vista in 2D dall’alto.
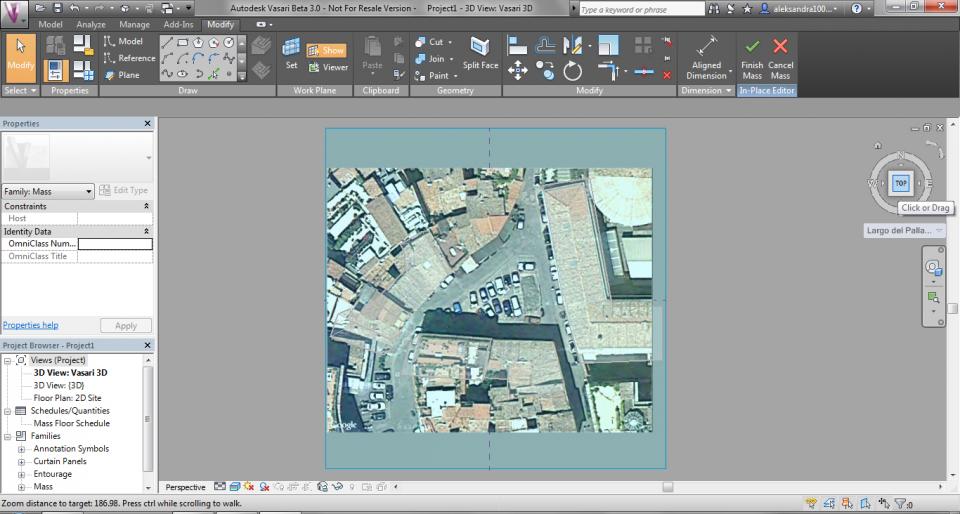
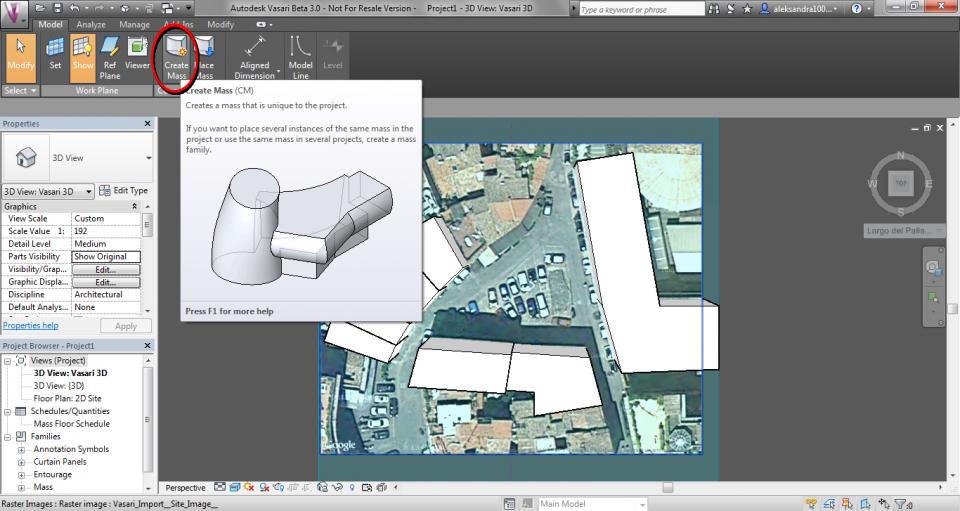
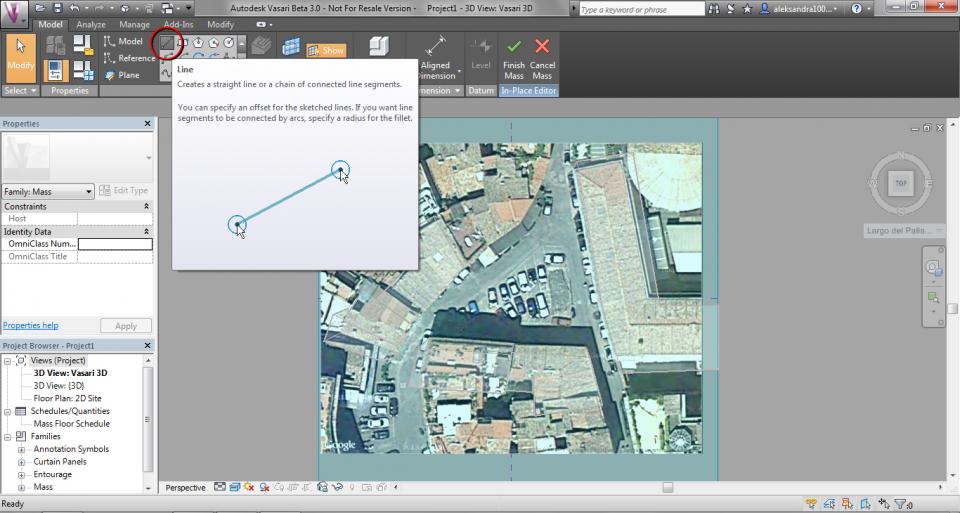
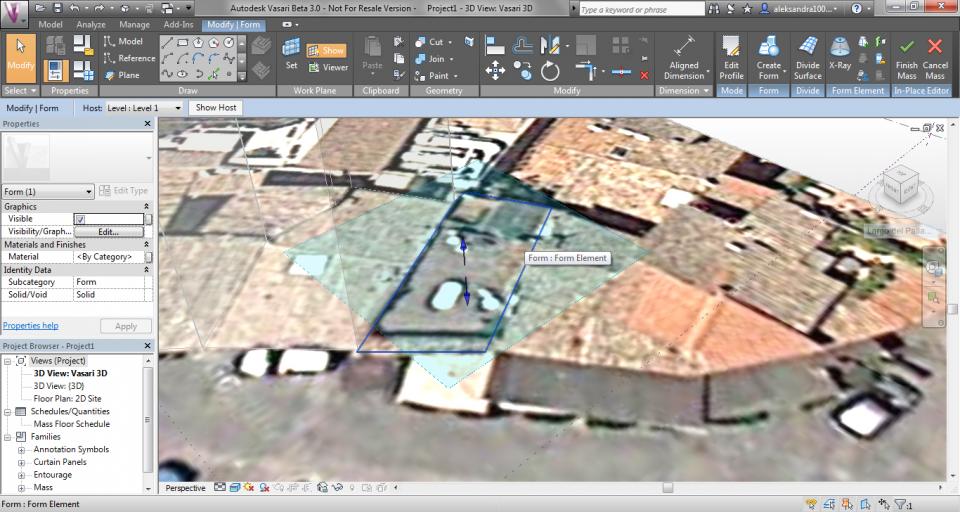
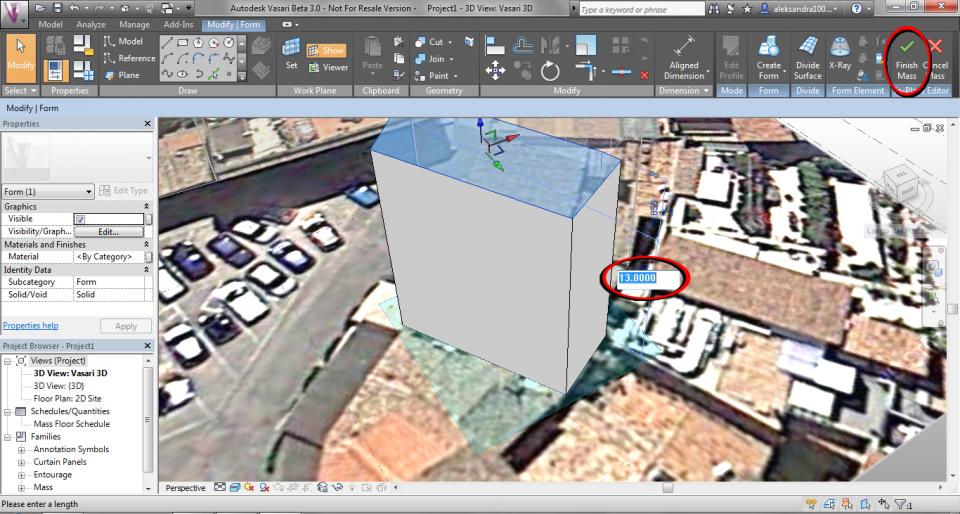
5. Go to the “Manage” tab, click on “Create Mass” to start creating the volumes of the buildings. Use the command “line” to crete the surfaces occupied by your buildings. Once you’ve done, click on “Modify” to get back the pointer with the arrow. Click inside the surface and two blue arrows will appear in the center. Drag the arrows to extrude the surface and create the volume. Click on the numbers to change the height and insert the new dimension. Do the same for the rest of the buildings.
Vai al tab “Manage”, clicca su “Create Mass” per iniziare a creare i volumi degli edifici. Usa il comando “line” per creare le superfici occupate dagli edifici. Una
volta fatte, clicca su “Modify” per tornare al cursore con la freccetta. Clicca dentro la superficie, nel centro di essa appariranno due frecce blu. Trascina le
frecce per estrudere la superficie e creare il volume. Clicca sui numeri per cambiare le quote e inserisci la nuova altezza. Esegui lo stesso procedimento per il
resto degli edifici.
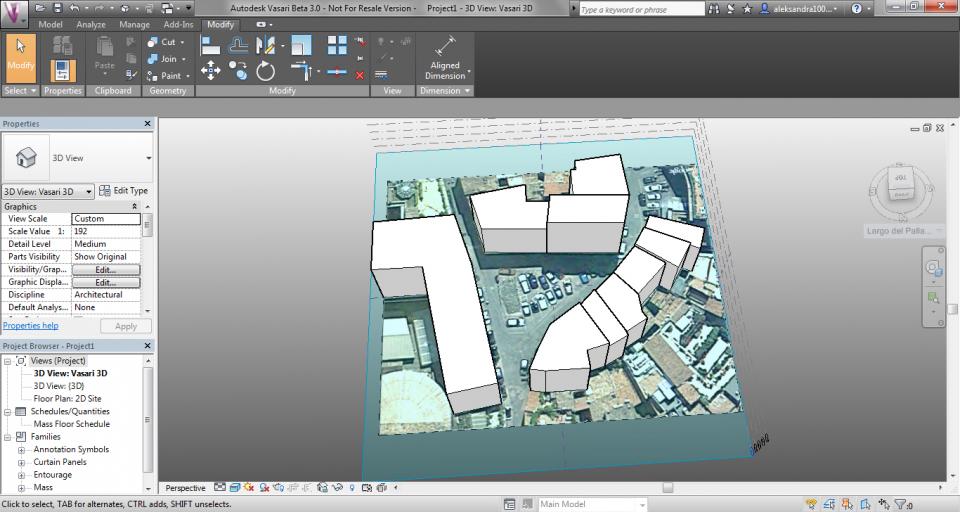
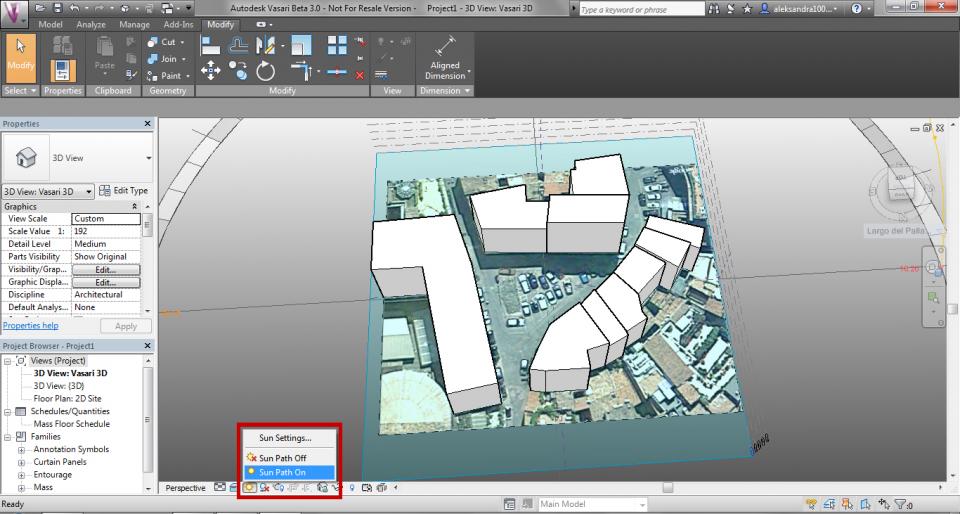
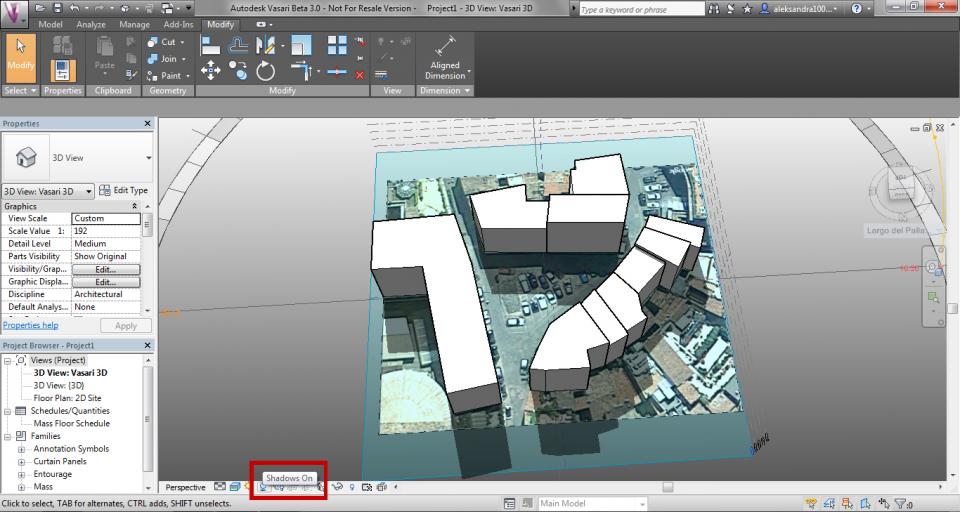
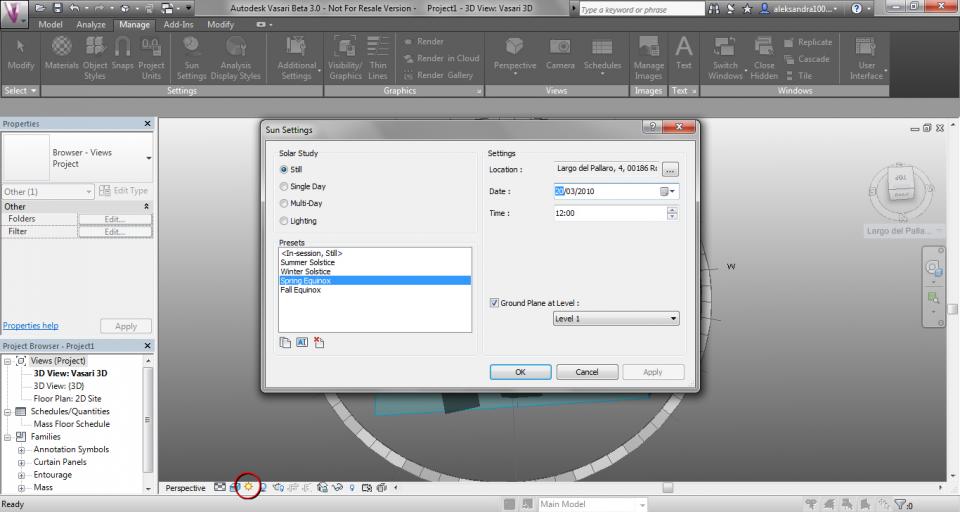
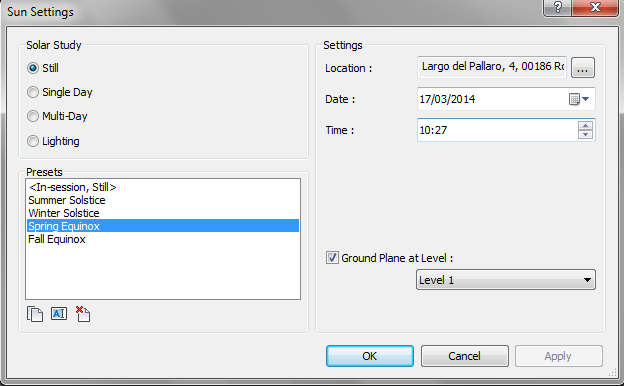
6. Once we have all the buildings, for the solar analysis we need to visualize the sun path and the shadows. For activating the sun path, click on the sun icon which is in bar on the bottom and click on “Sun Path On”; for activating the shadows, click on the icon (a ball with a shadow below) on the right of the sun icon. By clicking on the “Sun settings” (sun icon > “Sun settings”), you can set the date and the time when you want to analyse the shadows and compare with the phographs.
Una volta che abbiamo tutti gli edifici, per l’analisi solare abbiamo bisogno di visualizzare il percorso del sole e le ombre. Per attivare il percorso del sole,
clicca sull’icona del sole che si trova nella barra sul fondo e clicca su “Sun Path On”; per attivare le ombre, clicca sull’icona (rappresentata da una palla con
l’ombra sottostante) alla destra dell’icona del sole. Poi, cliccando su “Sun settings” (icona del sole> “Sun settings”), puoi impostare la data e l’ora in cui vuoi
analizzare le ombre e comparare con le fotografie.
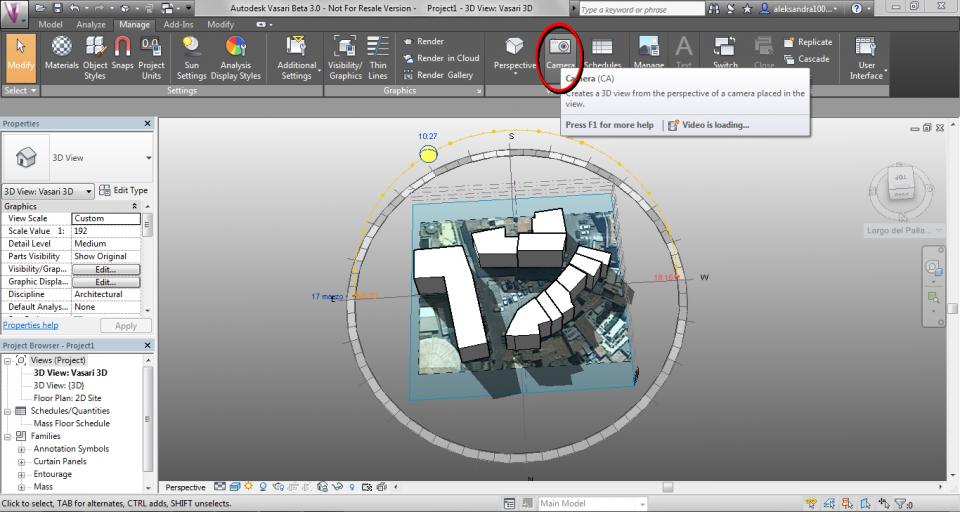
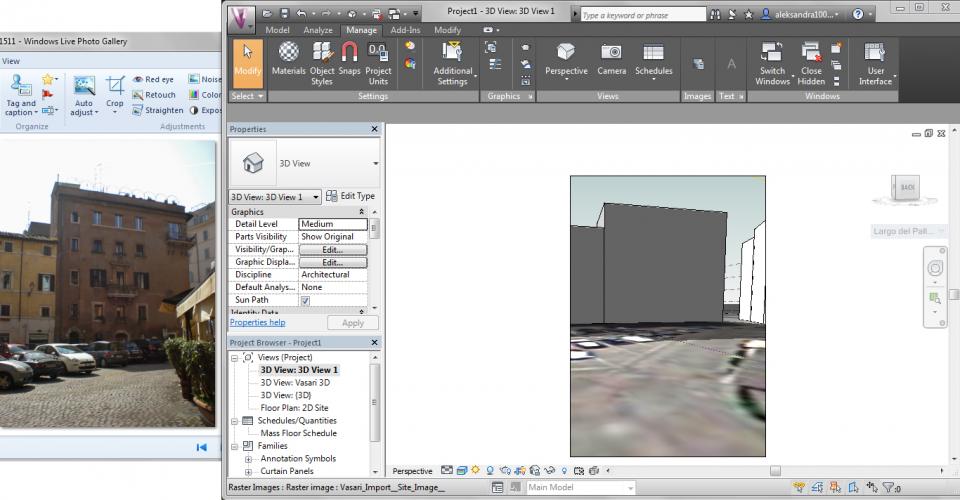
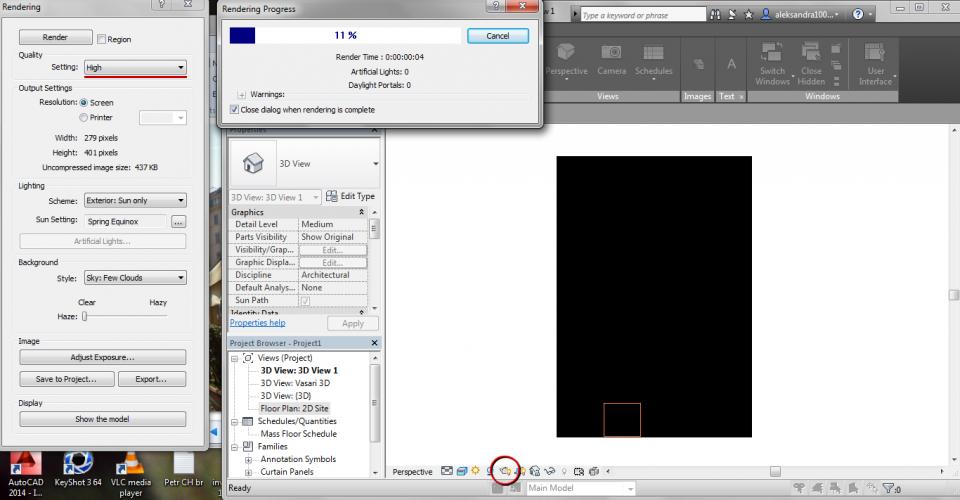
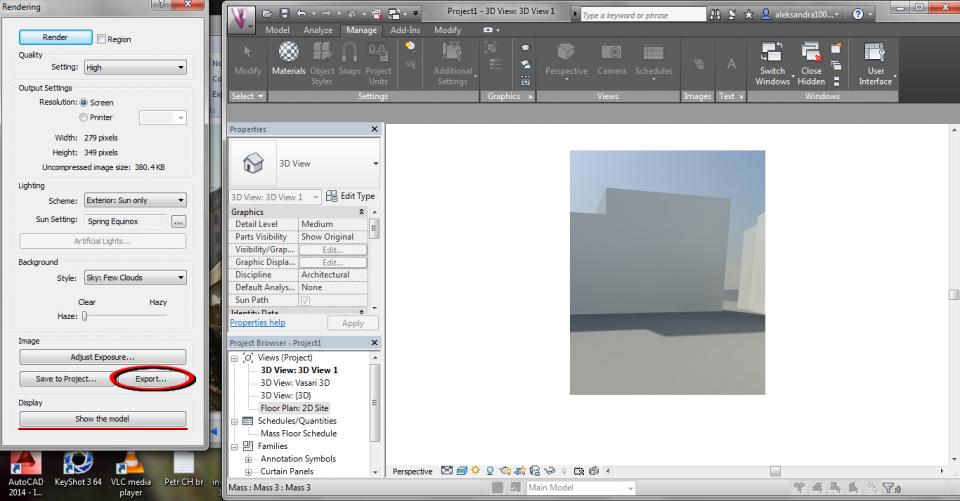
7. Go to “Manage” tab and click on “Camera” to create a 3D view from the perspective of a camera placed in the view. Place the camera in the position from where you took the real photograph and click when you finish. The “Modify | Cameras” tab will open, so set the view as much similar to the real photo as you can. Once you’ve done, click on the teapot icon (“Show Rendering Dialog”) to open the window with the rendering options. Set the quality of the rendering “high” and click on “Render”, then export the image. To exit the rendered view click on “Show the model”.
Vai sul tab “Manage” e clicca su “Camera” per creare una vista 3D dalla prospettiva di una fotocamera posizionata all’interno della vista. Metti la fotocamera
nella posizione da dove è stata scattata la foto della realtà e clicca quando hai finito. Si aprirà allora il tab “Modify | Cameras”, quindi imposta la vista più
simile possibile alla quella della foto. Una volta fatto, clicca sull’icona della teiera (“Show Rendering Dialog”) per aprire la finestra con le opzioni per la
renderizzazione. Imposta la qualità massima per il rendering (“high”) e clicca su “Render”, poi esporta l’immagine. Per uscire dalla vista renderizzata clicca
su “Show the model”.
SOLAR ANALYSIS - analisi solare
The building analyzed is located in Largo del Pallaro 4, near Campo De’ Fiori, in the historical centre of Rome. It has 5 floors and is places in a zone with high urban density that was built around the 1450 and it has a northern exposition, on a little square with no trees and with a parking lot. The other buildings that surround the small plaza are also about 15m in height and create create compact fronts that don’t allow the light to seep, exept from the top.
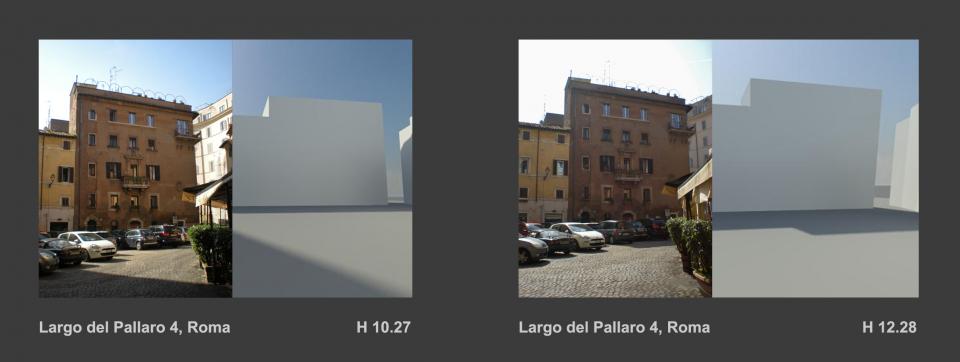
For all these reasons it’s clear and obvious that the interested façade will always be shaded, for all day and in all seasons, which can be helpful during the hot roman summers, but unuseful during wet winters. By creating a model od the building with Vasari and comparing it with the photographs, you can confirm that.
Analyzing the model in the hours when the square is mostly sunny, it is possible to notice a difference (already over two hours) in the brightness f the facade, depending on the quantity of light that comes from the square and hits it. Considering the exposure to the north, we can see that at around 10-10.30 the shadow near the palace is lower and the light that fills the square is more reflected on the building. This effect could be even intensified if we consider the reflection of the sun on the bodies of several cars in the parking lot.
L’edificio soggetto ad analisi si trova in Largo del Pallaro 4, vicino a Campo De’ Fiori, nel centro storico di Roma. Ha 5 piani ed è situato in una zona ad alta
densità urbana costruita intorno al 1450 e ha l’affaccio a nord, su una piccola piazza senza alberi e con un parcheggio. Gli altri palazzi che circondano la
piazza si aggirano sempre intorno ai 15m di altezza e creano dei fronti compatti che non lasciano filtrare la luce, se non dall’alto.
Per tutte queste ragioni è intuibile ed evidente che la facciata interessata sarà sempre in ombra, tutto il giorno e in ogni stagione, il che può essere un
vantaggio durante le estati afose romane, ma uno svantaggio durante gli inverni perlopiù umidi. Creando un modello dell’edificio con Vasari e confrontandolo
con delle fotografie, se ne ha conferma.
Analizzando il modello nelle ore in cui la piazza è maggiormente colpita dal sole, è possibile notare una differenza (già nell’arco di due ore) della luminosità
della facciata, in base alla quantità di luce indiretta che arriva dalla piazza e la colpisce. Considerata l’esposizione a nord, possiamo notare come intorno alle
ore 10-10.30 l’ombra vicino al palazzo è minore e la luce che invade la piazza si riflette maggiormente sull’edificio. Questo effetto potrebbe essere persino
intensificato se consideriamo il riflesso del sole sulle carrozzerie delle numerose auto presenti nel parcheggio.

Commenti
Immagini in Slideshow
Come molti altri, non sono sono riuscita a caricare le immagini accanto al testo perchè mi è "negato l'accesso".