Tu sei qui
Esercitazione 2_Solar Radiation Analysis_Lorenzo Pierini
PROCESS:
Step 1: Open your previous project you used for the Solar Analysis. For the type of analysis you're requested you need to add some details at the model of your building to obtain the most accurate data from it. Knowing that none of us lives in cubic boxes, we need to shape the outline of our house by selecting it and clicking Edit In-Place button in the Model box.
Step 2: In case you have a pitched roof you need to select the plane where you have to draw the slope of the roof so click Set in the Work Plane box (remember to have the Show icon turned on so you'll see where you're working on).
Now use the Line tool in the Draw box to draw the slope of the roof.

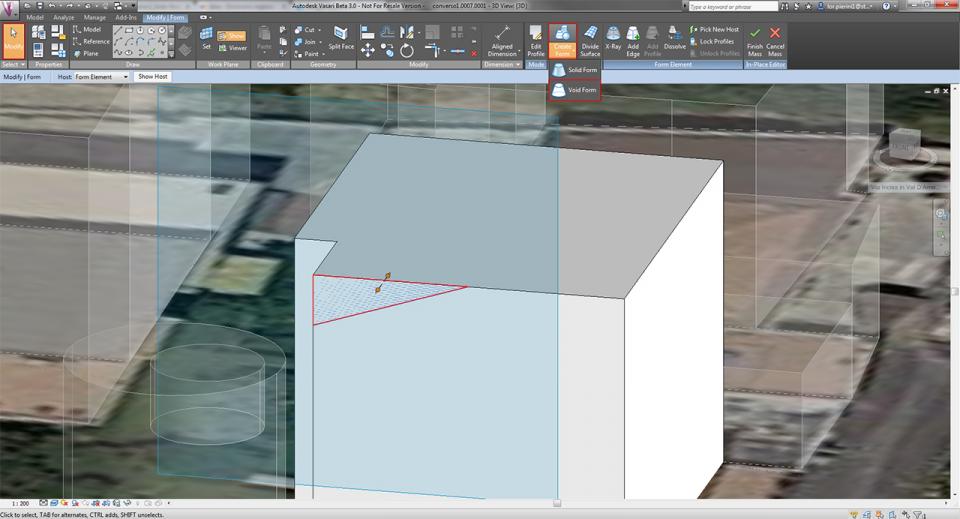
Having selected the Modify button in the Select box, click inside the triangle you have drawn, now click the Create Form in the Form box and then click Void Form.

Now you have to stretch the form to obtain the space that will create the void in the original form, using the arrows. When you have finished press Esc on your keyboard to see the final form. You can proceed fot the other slopes with the same process.
Step 3: In my case I've also some balconies on the East and the West facades (this also works if you have some parts of the roof that are beyond the plane of the facade) . I'll need to draw them on these facades. So I set the plane with the Set button on the East facade and using the Rectangle tool in the Draw box I draw the balcony (an useful tip is to use the front views in the View Cube on the top right) , eventually modifying some of the measures, like the height from the ground.
Like in the previous tutorial you now have to extrude the plane inside the rectangle using the Modify button and dragging the blue arrow toward the outside of the building and adjust the various measures. I also used this process to draw and extrude the shelter on the staircase entrance.
Step 4: In the end you need to have the plane of the ground level for the analysis: like the previous step I draw the plane using the Rectangle tool, and extruding it toward the bottom.
SOLAR RADIATION ANALYSIS
Step 1: For the analysis I clicked on the Analyze menu, then went on Solar Radiation button in the Solar Analysis box.
Step 2: You now need to click on the Arrow button and select the planes to analyze. In the Sun Study box you set the period of your analysis with the ... button. Set the Solar Study on Multi-Day and in Presets click on Summer/Winter Solar Study (depends on which period you're looking for the analysis). Set the Date and the Time and press OK. Be sure that in the Data Display in the Solar Radiation window the Type is set to Cumulative and the Unit is kWh/m2, click Analyze and then Close.
RESULTS OF THE ANALYSIS
My analysis is set in the Summer (from 20/06/2014 to 22/09/2014) and Winter (from 21/12/2014 to 19/03/2015) period, starting at 7 am and ending at 7 pm. The different plans are quite explicative, in fact there are big blue spots around the building, mostly in front of the West facade, where the garden is (I made sure to exclude from the winter analysis bare trees that would not helped the shading process). This alternance with light and shadows allows the garden to grow lush. While providing a cool place to be in the Summer thanks to the shades of trees, during Winter remains a cold and wet spot.
Explicit is the situation on the North facade, where the Sun pratically never reaches it. The facade is free from defects due to this situation, however, the roof of our canteen just under the facade, is shadowed by the house for most of the time, presenting a big spot of biological patina, caused by high umidity and lack of light.
There is another situation of wet spot at the ending of the garden on the West side, where the entrance of the canteen is. It's a perfect spot for every kind of moss, in fact there is a patina of it on the ground. From the actual photo is also visible the difference, mostly in winter period, between surfaces of a table irradiated from the Sun (white ones) and the others covered by a green patina, mostly shadowed during the day.
