Tu sei qui
Esercitazione 1_Analisi ombreggiamento (quart. Villa Bonelli - Roma)_Sara Bartozzi
PROCEDIMENTO/PROCESS
• Passo 0: avvio di Vasari
Step 0: start Vasari
• Passo 1: aprire un nuovo documento, cliccare su “Project units” e inserire tutte le nuove unità (fig. step 1).
Step 1: open a new document, click on “Project units” and write in all the new units (fig. step 1).
Manage > Settings > Project units

• Passo 2: impostare la vista come “Orthographic” per una migliore visualizzazione del modello in fase di realizzazione (fig. step 2).
Step 2: set up “Orthographic” view to have the best model visualization (fig. step 2).
Manage > Views > Orthographic

• Passo 3-4: impostare l'area di riferimento cliccando su “Location” e impostando l'indirizzo relativo; dopo, cliccare su “Import site image” e si aprirà una nuova finestra con l'immagine satellitare di Google; cliccare su “Import” e si avrà l'immagine trasferita sul piano di lavoro (fig. step 3 e step 4).
Step 3-4: set up referiment area clicking on “Location” and setting up relative address; after, click on “Import site image” and a new window with satellite image will open; click on “Import” and you'll have the image copied on the work plan (fig. step 3 and step 4).
Analize > Project location > Location


• Passo 5-6: creare i volumi con il pulsante “Create mass”, impostando il contorno chiuso della superficie, per poi estruderlo una alla volta; cliccando sulla freccia blu diretta sull'asse Z si può impostare l'altezza, presa calcolando approssimativamente i piani degli edifici in questione. Alla fine, premere “Finish mass”. (fig. step 5 e step 6).
Step 5-6: create volumes clicking on “Create mass”, setting up closed edges and extruding them one at time; clicking on the blue arrow with the direction of Z axis, you can set up height, taken calculating structure's floors measure approximately. At the end, click “Finish mass” (fig. step 5 and step 6).
Model > Conceptual mass > Create mass/Finish mass


• Passo 7: studiare il soleggiamento cliccando in basso a sinistra su “Sun path ON” e “Shadows ON” per visualizzare il posizionamento del sole alle varie ore della giornata; impostare l'ora e la data cliccando su "Sun settings" (fig. step 7).
Step 7: study sunshine clicking in the lower left on “Sun path ON” e “Shadows ON” to visualize sun position in some day hour; set up hours and days clicking on "Sun settings" (fig. step 7).

• Passo 8: per impostare le viste, cliccare su "Camera" e posizionare l'icona sul punto di vista preferito; a sinistra sul Project Browser appariranno le varie viste impostate (fig. step. 8)
Step 8: to set up views, click on "Camera" and put the icon on the favourite point of view; on the left, in the Project Browser, new views set up will appear (fig. step 8)
Manage > Views > Camera

ANALISI/ANALYSIS
L'area analizzata fa parte del XI municipio (ex XV) e si trova in un lotto compreso tra via Francesco Calzolaio, via Vincenzo Statella e via Ignazio Ribotti.
La palazzina in questione, composta da 4 piani più una mansarda, si trova in un complesso di quattro palazzine, identiche due a due; sia internamente al condominio, sia nel resto del lotto, troviamo una gran quantità di alberi e verdi, che tendono a schermare le facciate più esposte: infatti, nell'analisi che segue, alcune facciate risulteranno più ombreggiate nella realtà rispetto al modello di Vasari; in ogni caso, è visibile a occhio la differenza, in quanto le ombre del verde risultano meno compatte rispetto quelle degli edifici limitrofi.
The analized area belongs to XI city hall (ex XV) and it is located among via Francesco Calzolaio, via Vincenzo Statella and via Ignazio Ribotti.
The building analized, that has 4 floor and an attic, is located in a unit of four buildings, identical two by two; in all the condominium we find numerous trees and green zone, that shields the most exposed facades: in fact, the difference between Vasari's model and the photos is visible; anyway, we can discern the difference, because trees' shadows are less compact than the building ones.
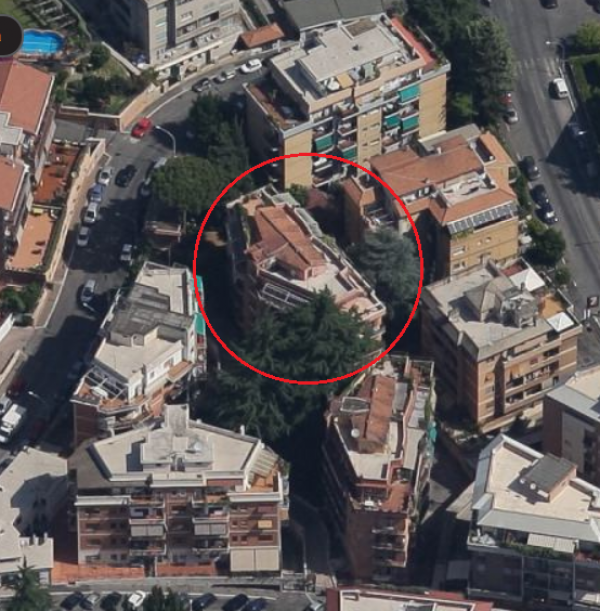
Facciate analizzate:
Analized facades:
• ORE 17.15 DEL 14 MARZO / MARCH, 14th AT 5.15 PM
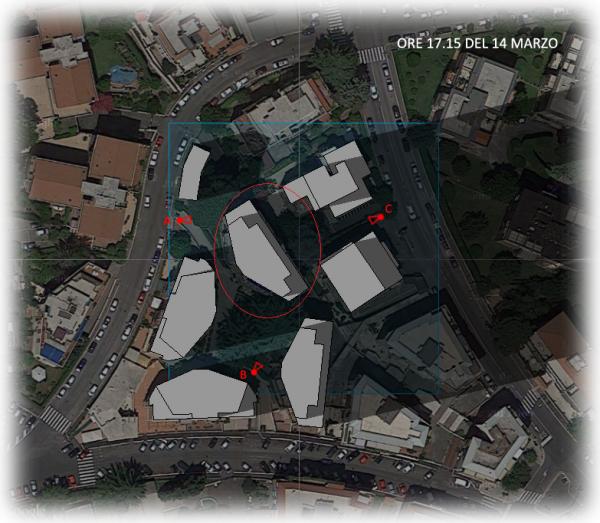
- A: facciate esposte a Nord e Nord-Ovest - facedes esposed at North and North-West
- B: facciate esposte a Sud-Ovest e Sud-Est - facedes esposed at South-West and South-East
- C: facciata esposta a Nord-Est - facade esposed at North-East


• ORE 10.30 DEL 15 MARZO / MARCH, 15th AT 10.30 AM
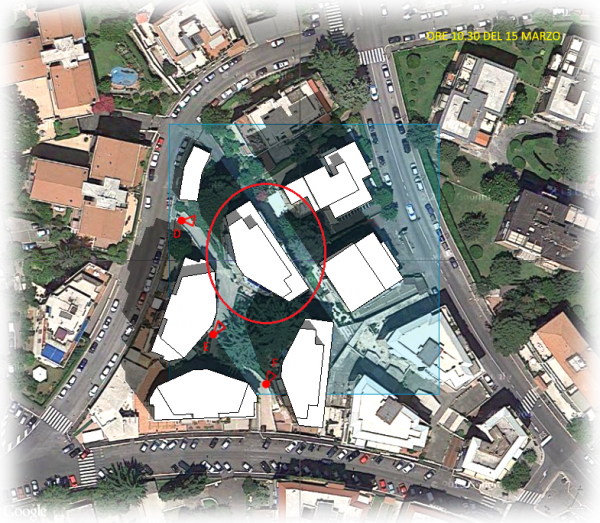
- D: facciate esposte a Nord e Nord-Ovest - facedes esposed at North and North-West
- E: facciata esposta a Sud-Ovest - facede esposed at South-West
- F: facciate esposte a Sud-Ovest e Sud-Est - facedes esposed at South-West and South-East


• ORE 14.00 DEL 15 MARZO / MARCH, 15th AT 2.00 PM
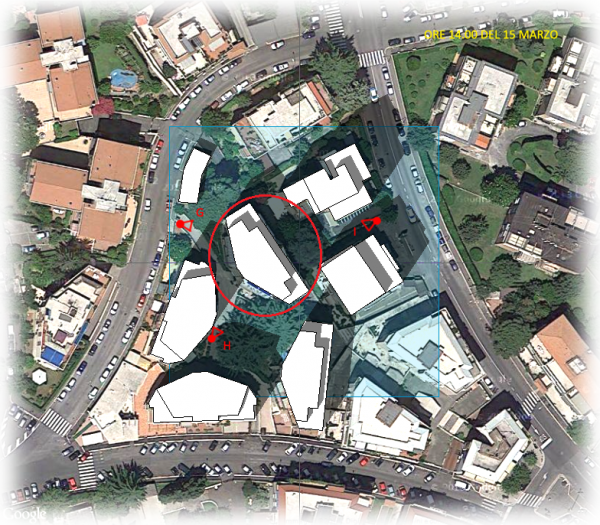
- G: facciate esposte a Nord e Nord-Ovest - facedes esposed at North and North-West
- H: facciata esposta a Sud-Ovest - facede esposed at South-West
- I: facciata esposta a Nord-Est - facade esposed at North-East


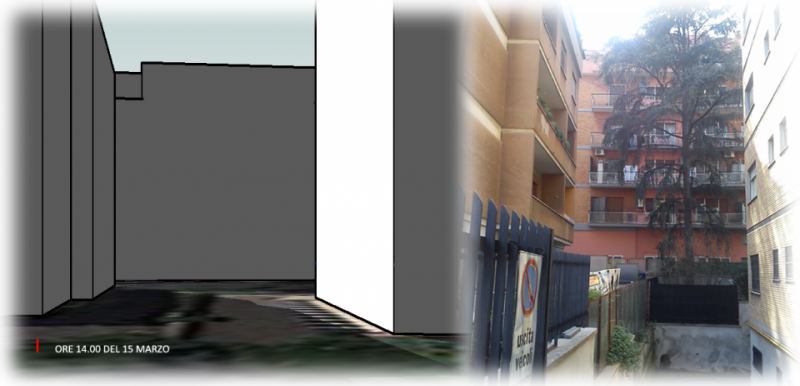
NB: le parti soleggiate nel modello risultano in parte ombreggiate in foto a causa degli alberi e del tempo parzialmente nuvoloso.
NB: in Vasari' model, sunny parts seems to be shaded because of shadows's trees and partly cloudy weather.

Commenti
Ottimo post Sara, uno dei migliori al momento, ma...
...maybe it would be better with images IN THE post, not just a slideshow!
una domanda sulla tua analisi?
C'è differenza di percezione tra l'ombra del verde e quella degli edifici (stando in casa)?
In effetti il mio obiettivo era quello...
...but I had a problem: when I go to modify post in "Corpo" I have this window http://i58.tinypic.com/2i9ov87.png and not the window shown in the tutorial videos "UploadImgs_1" and "UploadImgs_2".
No, in casa non c'è alcun tipo di differenza, infatti le facciate risultano ugualmente ben ombreggiate.
Use "FULL HTML"
Option below in the image!
Non mi cambia nulla purtroppo!
La finestra rimane uguale.
Ho finalmente risolto!
I've post images into my post!
Il post ora va bene
il modo di mandare immagini NO!
Ho provato a seguire i video del vademecum
ma la finestra "Corpo" - sia con Full html che Filtered html - risulta senza comandi di editing del testo e quindi di upload foto. Sono riuscita a caricarle all'interno del post solo in questo modo.